How to create a WordPress blog using Cloudways

Table of Contents
Today, you will learn how to set up a WordPress blog using Cloudways. Using cloud hosting for your WordPress blog is an excellent idea and a smart move, I’ll explain why later in this post.
Even if you have no technical experience, do not worry! I will guide you through every step of the way. You will be sipping your coffee and creating content for your WordPress blog on Cloudways before you know it.
On top of providing a step-by-step guide on how to create a WordPress blog using Cloudways, I’ve also got some fabulous surprises for you along the way! Do you like the sound of discounts, or perhaps the sound of free stuff? 😉
At the end of this post, you will have a lightning-fast, secure and reliable blog which is ready for the future!
Do you already have an existing WordPress blog, but want to start using Cloudways? I’ve got you covered as well! At the end of this post, I will explain how to migrate an existing WordPress installation to Cloudways. This will only take a few minutes!
Why should you have your own blog?
Let’s get started by explaining why you should have your own WordPress blog. After all, there are so many other platforms where you could just create a profile and start blogging, right?
Yes, that is right. You could create a profile on Blogger or Medium and start creating content in minutes. Platform such as Medium should be used as a tool to drive traffic to your own website. Here are some strategies for that.
Do you really want that though? You need to start by asking yourself why you want to have a blog. Some questions you should consider are:
- Do I want to generate an income from blogging?
- In the future, is there a possibility that I would create an e-book or another digital product which I’d like to promote?
- Do I want to have full flexibility?
- Do I want to transform my blog into a business in the future if things are going well?
- Do I want to create a subscribers list?
If you answered any of the above questions with yes, you should create your own WordPress blog. My advice is to always think about your long-term goals. Even if you don’t want to generate an income from blogging now, maybe in 5 years your vision will change.
This does not mean that you can’t also post on platforms such as Medium. Medium is an excellent tool to funnel traffic towards your own blog, but it shouldn’t be your primary blogging platform.
Fortunately, it is a piece of cake to set up a blog of your own, with your domain name of choice, branding, audience, and income.
Hosting for your WordPress Blog
One of the first things that you should think about is hosting options.
Hosting is where your blog will live on the internet. Without a hosting provider, no one will be able to access your WordPress blog. Hosting can be seen as a house. If you don't have a house, you can't receive visitors.
If you are unfamiliar with all the different hosting options, then please see my post How To Select Your WordPress Blog Hosting Provider. When it comes down to blog hosting options, you have 4 options:
- Shared Hosting;
- Virtual Private Servers (VPS) Hosting;
- Dedicated Hosting;
- Cloud Hosting.
In this post, I will guide you through setting up your WordPress blog on cloud hosting.
Cloud hosting is often called the future of web hosting, and for good reasons! Many websites will or already have transitioned to cloud hosting.
The most significant advantages of cloud hosting are:
- Cloud hosting is afforable because you only pay for what you use. Who doesn’t love this?
- Cloud hosting is flexible and scalable. Resources are available in real-time and according to your requests. If you need a bigger server size, a click on a button and it is done!
- Cloud hosting is secured from third-parties who want to interrupt your service (DDoS attacks).
- Cloud hosting is very reliable as it is using many physical servers around the world. Let’s say one of the servers goes down, there are still many other servers that got your back! No downtime for your readers, ever!
- Cloud hosting is extremely fast.
Any SEO professional would agree that a fast website are critical to the conversion and success of a website. If you want to see how vital website speed is, then I invite you to take a look at this blog post on the website of Neil Patel. There is also an excellent infographic on that page. I’d like to highlight two statistics from the mentioned article.
“40% of people abandon a website that takes more than 3 seconds to load.“
“If an e-commerce site is making $100,000 per day, a 1-second page delay could potentially cost you $2.5 million in lost sales every year.”
Those statistics speak for themselves. Especially when starting out a new blog, you need to retain every visitor that you manage to get to your website.
You probably want to achieve exponential business growth. A technique commonly used for this is growth hacking.
All-in-one hosters (Bluehost, Hostgator,… )
As I value you as my reader, I’d like to warn you. Many companies such as Bluehost and Hostgator provide all-in-one hosting options. This means you purchase a hosting package and you will get a free domain name.
Often, you see ridiculously cheap offers such as shared hosting for $3.95 per month. Please be very careful with those offers. Those offers are only valid when you pay 3 years in advance. This means that you have to pay 3 years for hosting, while not even having your blog up and running yet! This is a substantial initial investment. In the past, I’ve made this mistake. Hopefully, I can refrain you from making the same mistake.
I won’t go into details in this post, but here I’ve explained why you should not host your website at those companies.
The benefits of hosting your WordPress blog on Cloudways
I’m very picky with the companies with whom I do business and recommend to other people. Markletic is running on Cloudways and I’ve had nothing but a great experience with Cloudways.
Here are some of the benefits that I’ve experienced using Cloudways:
- No lock-in, you pay as you go. This means that you can pay monthly and in case you want to switch hosting companies, you are not stuck to a 3-year contract like with the all-in-one hosting companies.
- Affordable. For a small website, you can host your WordPress blog for as little as $10 per month. Cloudways enforces real-time billing, you only pay for what you use.
- Free trial. You can try out the platform for free. You don’t need to submit your credit card details during the trial period.
- The one-click WordPress installer beats the competition. Cloudways automatically installs advanced plugins such as caching which speeds up your website drastically.
- Integrated back-ups. Cloudways comes standard with daily back-ups. Imagine having 100 posts on your website and your site crashes without back-ups. You’d be in big trouble. This is not an issue with Cloudways.
- Amazing support. I’ve had nothing but great experiences with the Cloudways support team. Open up the live chat, and someone is helping you instantly. For me, great support is one of the most important reasons for selecting a company.
- Scalability. You can upgrade your server with one click on the button may your website traffic increase.
Things you should know before starting
Cloudways is not an all-in-one hosting provider. This means that you need to purchase your domain name at another company. Don’t worry, I will guide you through every step to get your WordPress blog live using Cloudways, including purchasing a domain name.
Purchasing a domain name is the only up-front payment which you will have to make. You can try out Cloudways for free, and after your trial, you will be making cheap monthly payments with no lock-in. If you don’t like it, you can stop at anytime.
If you already have a domain name, then that is great! If not, a domain name typically costs around $5 - $20 per year.
Without further ado, let’s get started with the step-by-step guide on setting up your WordPress blog using Cloudways.
Create your WordPress blog using Cloudways
Remember that I told you there will be surprises in this post? Well, here is the first one!
You're in luck! I've got a Cloudways promo code that you can use to get 20% discount on your hosting with Cloudways. Simply click on the link below.
Get 20% discount on your
Cloudways hosting
Just follow the link, use the Cloudways promo code: MARKLETIC
Click Here
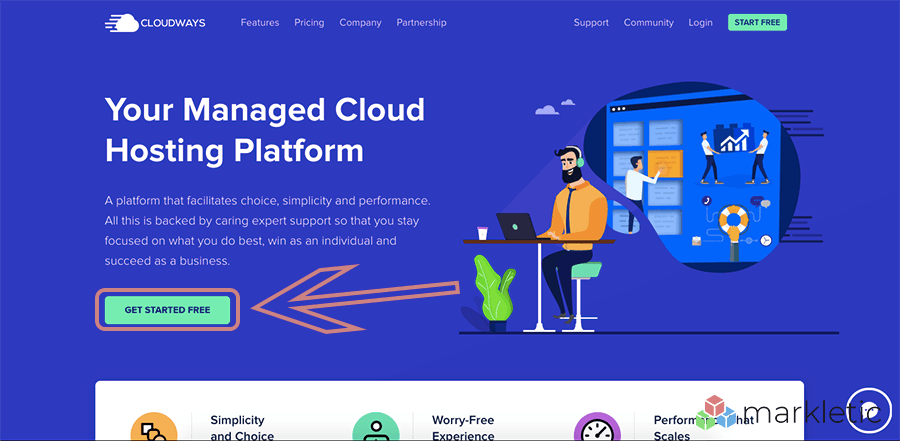
In order to get started, first click on the "GET STARTED FREE" button.
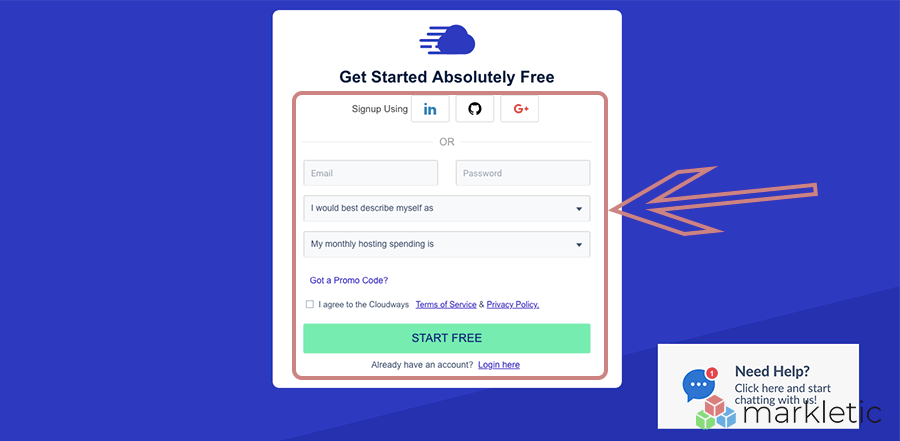
Create an account.
Don't forget to add the 20% Cloudways promo code: Markletic
After you have created your account, you will receive an email. Go to that email and activate your account.
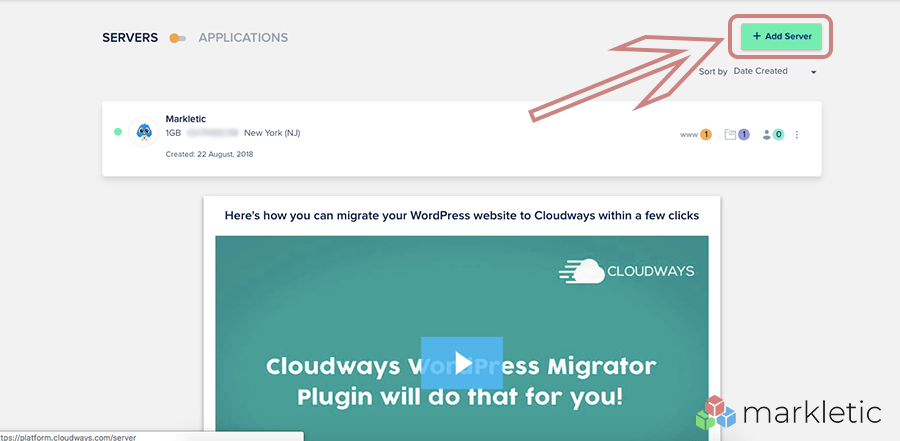
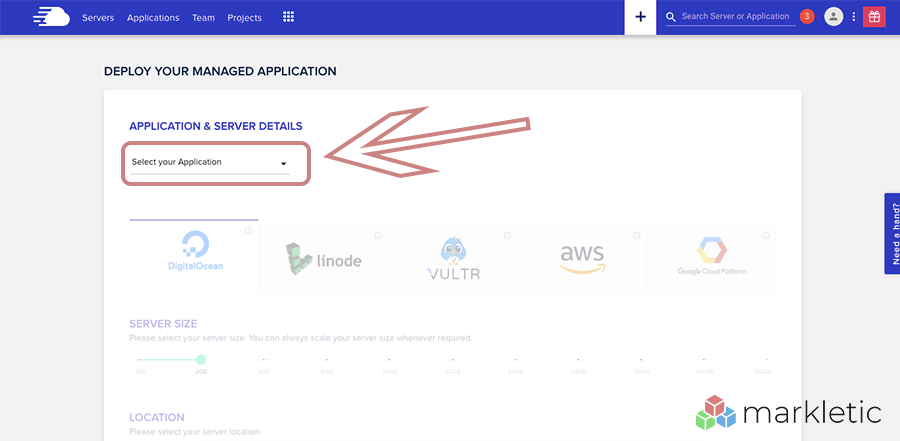
Once activated, log in to Cloudways and click on "Add Server".
Click on "Select your Application".
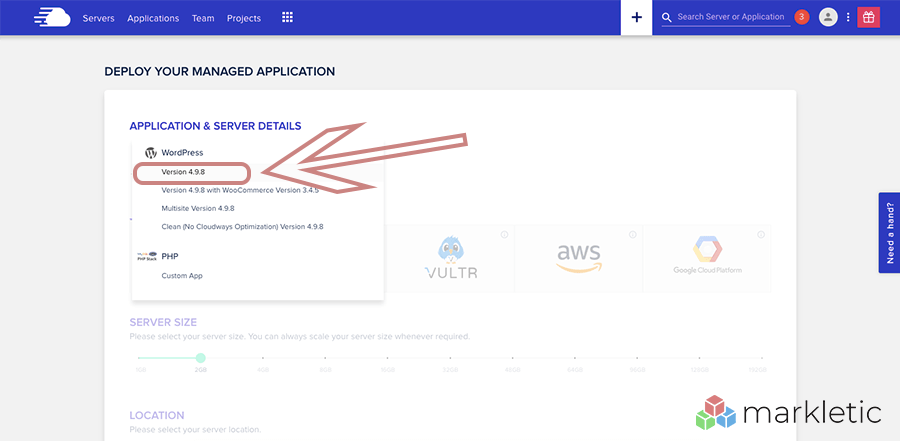
Select the latest version of WordPress. In the example below, it is WordPress 4.9.8.
Now we have to give a name to your Cloudways server and application. This is strictly internal naming and not visible to the outside world.
- Name your Managed APP;
- Name your Managed Server;
- Select a project or create one.
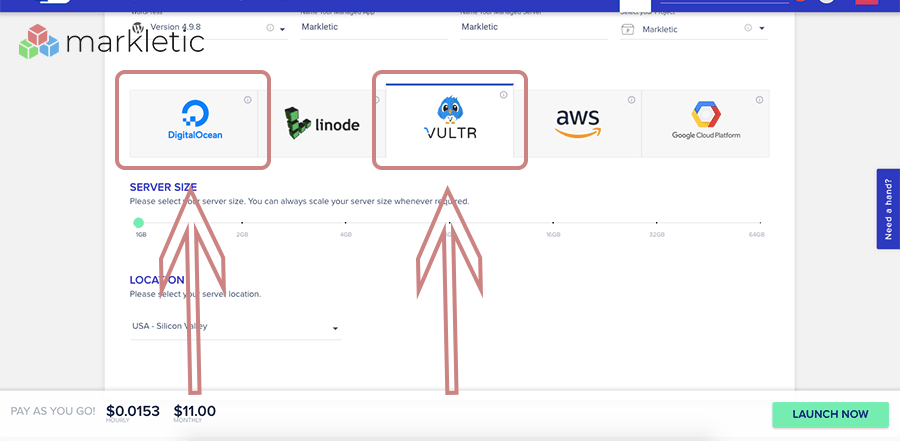
Select a cloud hosting provider. This will be the actual hosting provider where your WordPress blog will be hosted. Cloudways will manage and maintain this server for you. Cloudways will always make sure your server has the latest security features and so on.
Personally, I use Vultr, but DigitalOcean is also great!
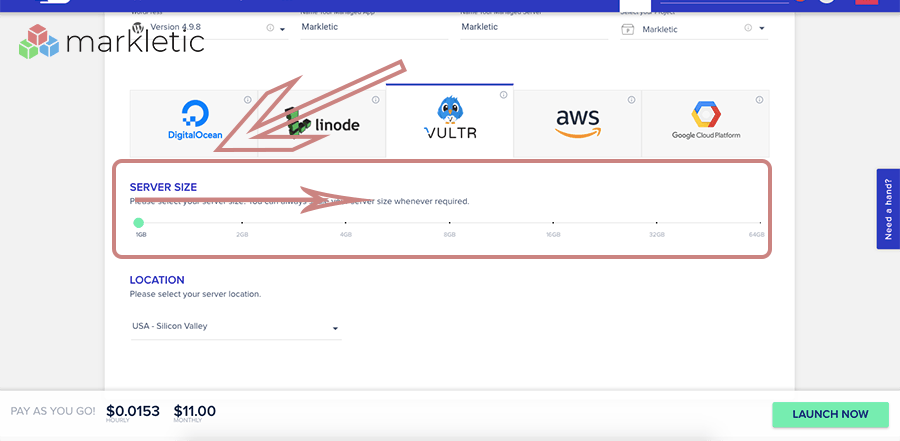
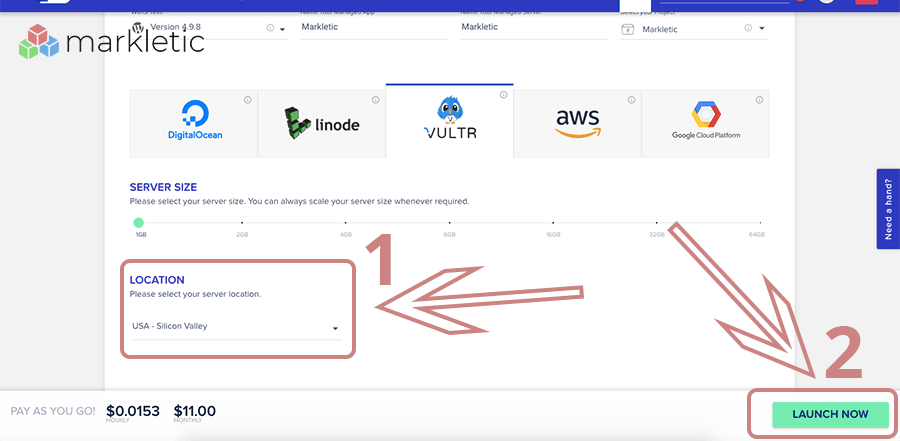
The next step is selecting your Server Size.
For a low traffic or new website, you can select a server size of 1GB. The great thing about creating your WordPress blog using Cloudways is that you can easily expand your plan if you need a bigger server.
Now, first select the location of your server.
Think about where your target audience is located. If you want to target people in the United States, then select a location in the United States. If your target audience is in Brazil, then select a location in Brazil.
After selecting your server location, click on "Launch Now".
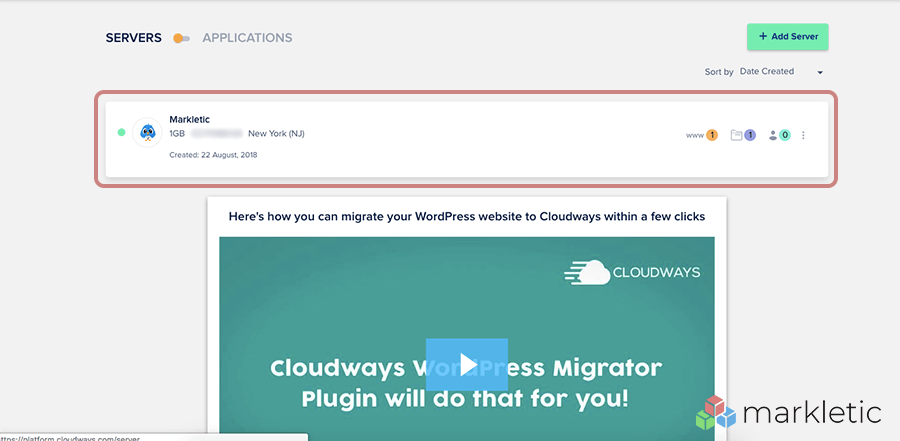
Your screen should look like the image below. Congratulations! You've successfully created your server and WordPress blog!
There are still a few steps we need to do though. We'll be going through the steps at rocket speed.
Please note: it takes a few minutes for your server and application to finish setting up.
Purchase your domain name using Namecheap
The next step is to purchase your domain name. This is the only up-front payment which you will have to make. It will cost you about $8 per year.
I’ve purchased all my domains at Namecheap. As the name suggests, the prices are cheap and straightforward. My top reason for picking Namecheap as my domain registrar is because of their excellent service. I’ve had some issues in the past with some settings and their staff solved my problems within minutes using the live chat.
You could purchase your domain name at the company of your choice, but this tutorial is easier to follow if you have purchased your domain name at Namecheap. If you have purchased it somewhere else, do not worry. You can still follow this tutorial, as the process will be the same at every domain name registrar. The only difference will be the interface.
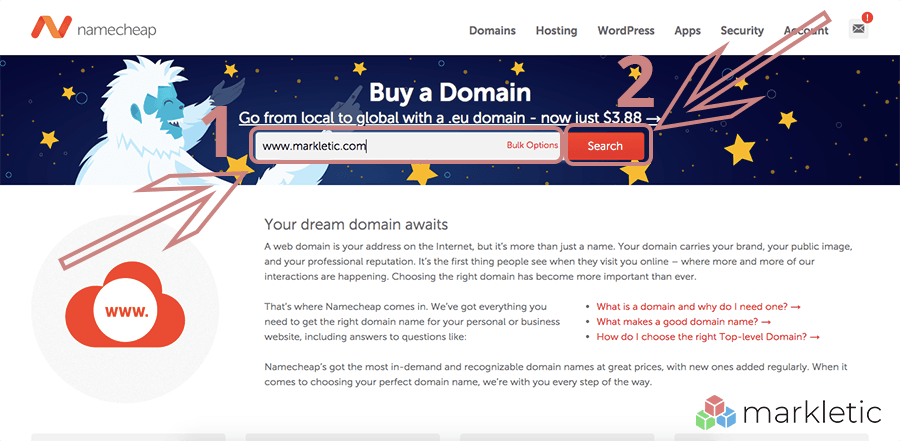
Go to Namecheap and purchase your domain name.
After you have purchased your domain name, we can continue with this step-by-step guide on creating your WordPress Blog using Cloudways.
During the process of purchasing your domain name, your application should now be ready.
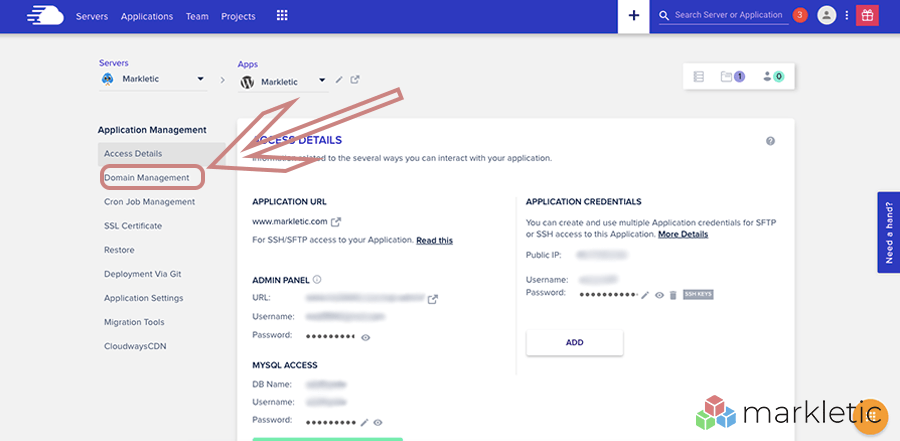
First go back to Cloudways and click on "www" and then click on the name of your application.
Click on "Domain Management".
First enter the name of your domain under "Primary Domain".
Please use this format: www.example.com.
Secondly, click on "Save Changes".
Linking your domain to your server
Another step in creating your WordPress blog using Cloudways has been completed. You're doing great!
We've set up your server and created your WordPress application. In addition, we've purchased a domain name and we've notified your server which domain name we will be using.
The next step is to actually point your domain name towards your server. If you are not a technical person, this might be confusing to you. I will explain in straightforward language what we will be doing during the next steps.
Image that your server is a house and that your domain name is the street address. We need to make sure that your street address and house are linked. During the next steps we will be telling your domain name, where your house is located.
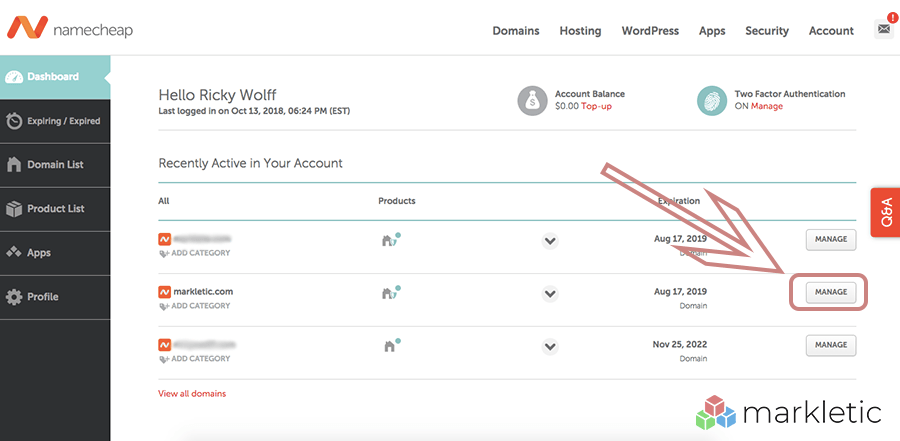
Go to your Namecheap dashboard and click on the "Manage" button of your domain.
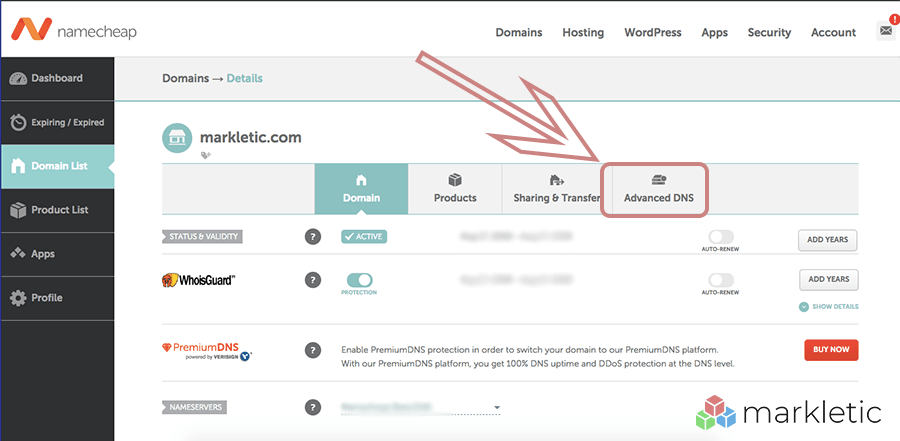
Click on "Advanced DNS".
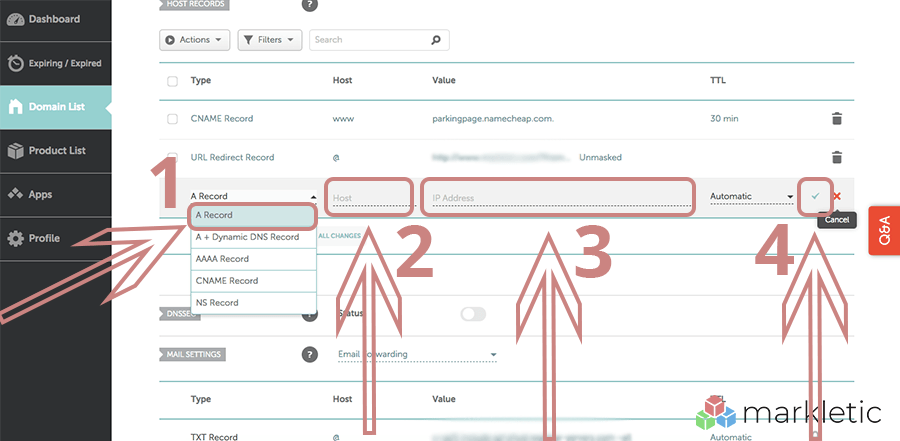
We need to add two new records.
Click on "Add new Record".
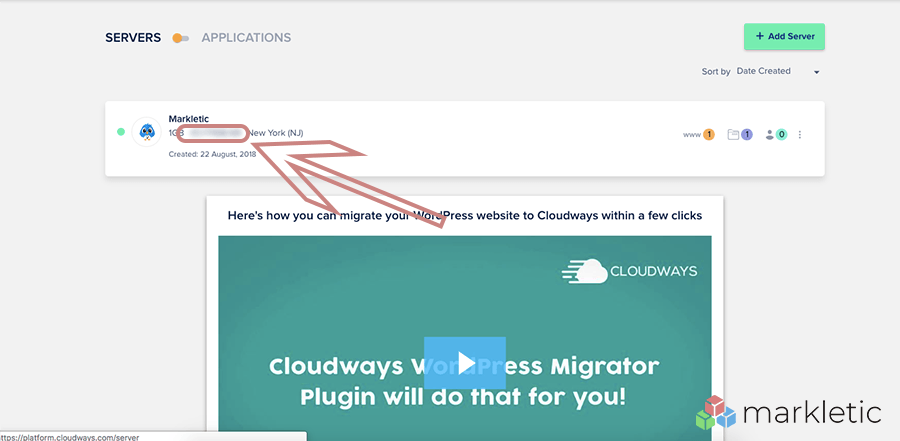
Before adding the new record, you need to know the IP address of your server. This is very simple to find out.
Go to your Cloudways dashboard and then take a look at the screenshot below. I've blurred my IP out, but the numbers displayed there is the IP address of your server.
Usually, it looks something like: xx.xxx.xxx.xx
Copy these numbers.
The records that we will be adding are called "A Records".
As mentioned, we will be adding two records.
The first record will be:
Type: A Record
Host: @
Value: your server IP. Something like xx.xxx.xxx.xx
TTL: Automatic
The second record will be:
Type: A Record
Host: www
Value: your server IP. Something like xx.xxx.xxx.xx
TTL: Automatic
Note: it can take sometime for your changes to take effect. Sometimes this will take a few hours, but usually it is quite fast. You can proceed with the tutorial though!
After adding the two A Records, we can go ahead and delete the other two records.
Delete the records displayed in the screenshot below. Just click on the trash can icon.
Your screen should look like the screen below, with only 2 A Records, and no other records.
Installing a free SSL certificate!
More surprises coming your way! We will now be installing a free SSL certificate.
If you are not a technical person, a SSL certificates creates an encrypted connection and establish trust. Basically that means that your website data is secure. This is very important. Without a SSL certificate, Google will penalize your website.
With an installed SSL Certificate, your website url should look like this: https:/www.example.com.
Without an SSL Certificate, your website url looks like this: http://www.example.com
Let's get started with installing your free SSL Certificate on Cloudways.
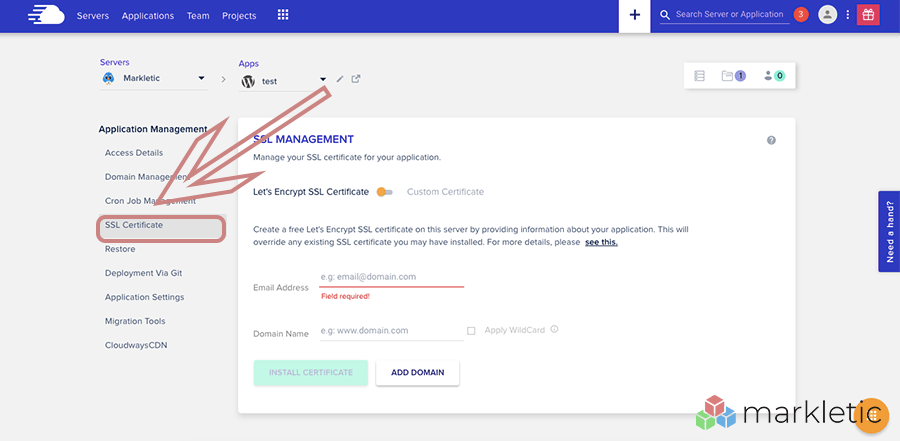
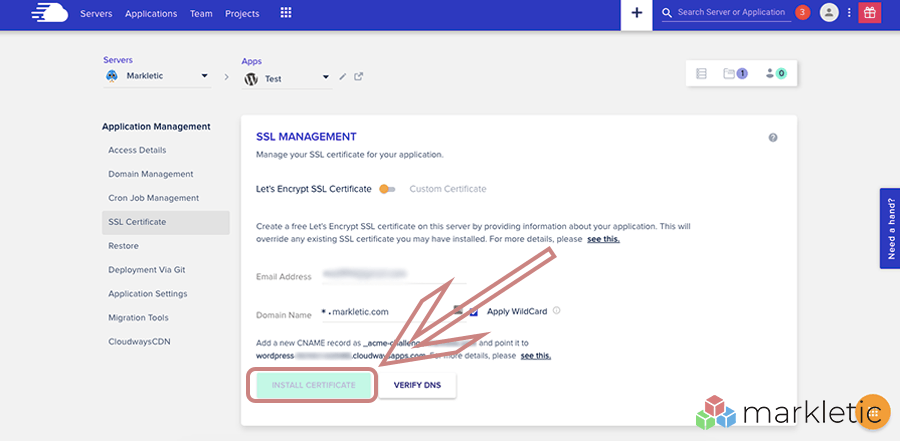
Go back to your application settings on Cloudways and click on "SSL Certificate".
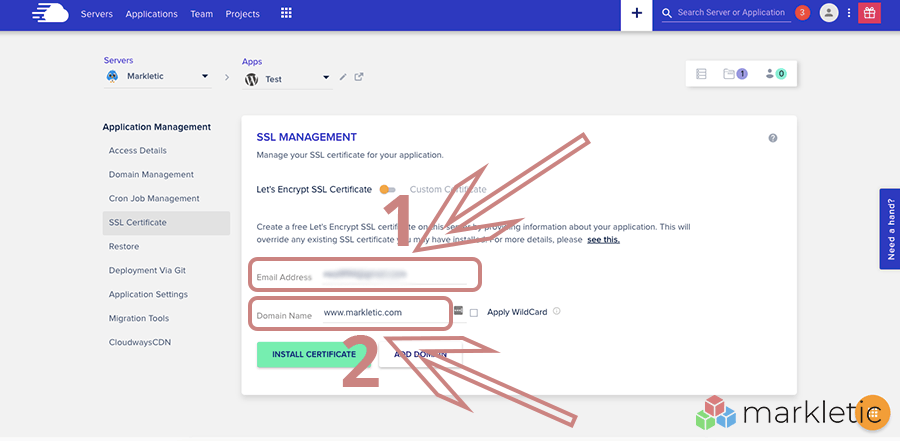
First enter your email address, and then enter your domain name.
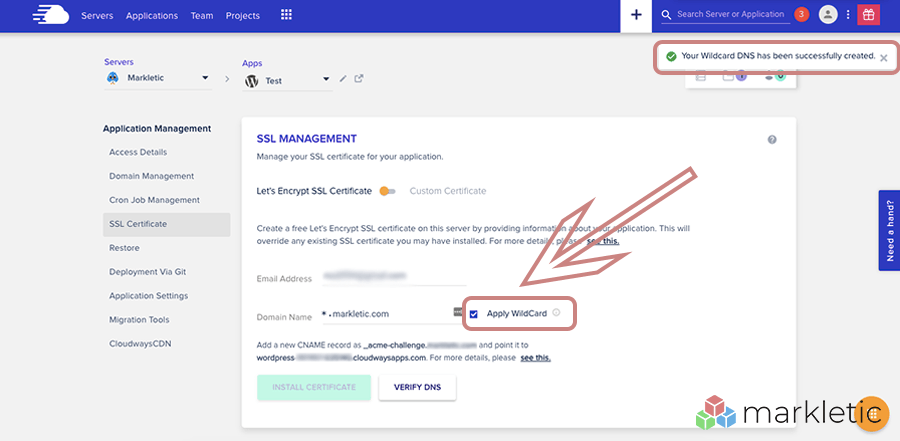
Check the box "Apply WildCard".
A new paragraph appeared, which is highlighted in the screenshot below.
In order to properly install the SSL Certificate, we need to add one more record at our domain name registrar. In case of this guide, that will be on Namecheap.
Go back your "Advanced DNS" settings on Namecheap.
Click on "Add a Record"
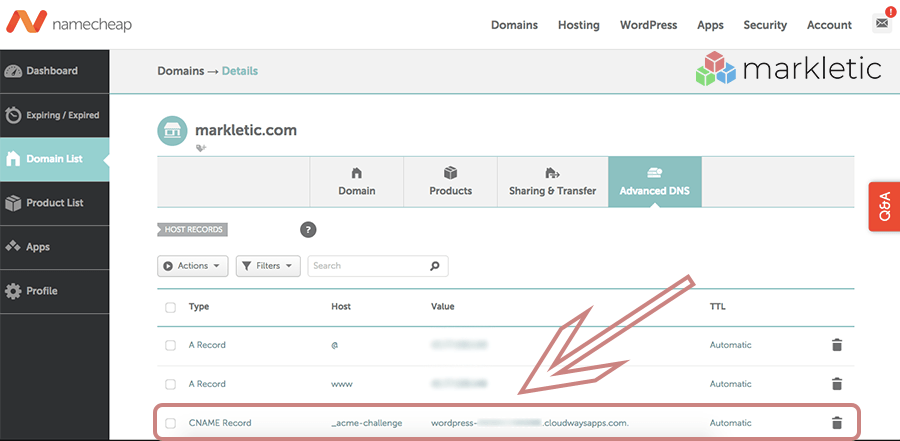
Add the following record:
Type: CNAME Record
Host: _acme-challenge
Value: wordpress-xxxxxx-xxxxxx.cloudwaysapps.com. (mind the dot, it should be included!) Make sure you copy this value from the paragraph highlighted in the above screenshot.
TTL: Automatic
Your screen should look something like the screenshot displayed below.
Now go back to Cloudways and click on "Verify DNS".
Please note: sometimes it takes a while for the CNAME Record that you added to take effect across the internet.
If your DNS is successfully verified, you can go ahead and click on the button "Install Certificate".
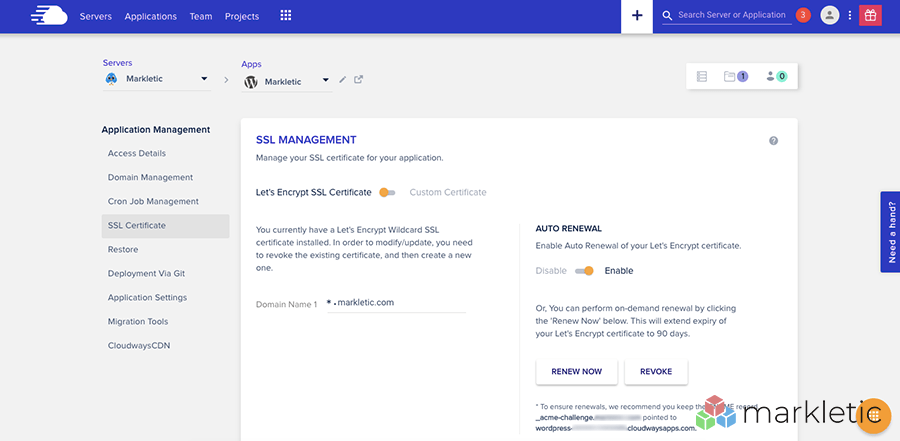
Congratulations! You have now installed a SSL Certificate for your website! A piece of cake, right?!
Your screen should now look something like the screenshot below.
Let's check out your brand new WordPress blog on Cloudways!
You have successfully installed your WordPress blog and make it secure with a SSL Certificate. Let's have a look at your brand new site.
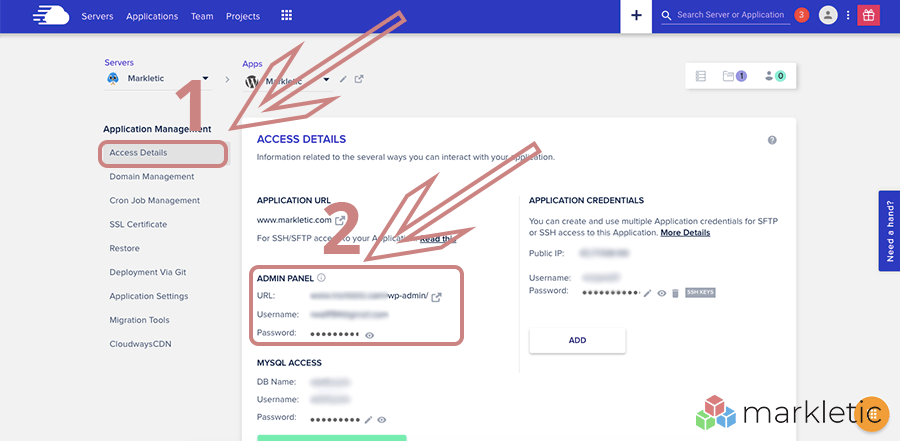
First click on "Access Details".
Underneath "Admin Panel", you will see the link to your login page of your WordPress blog.
It will look something like: https://www.your-domain.com/wp-admin/
Visit that URL and login to your WordPress blog.
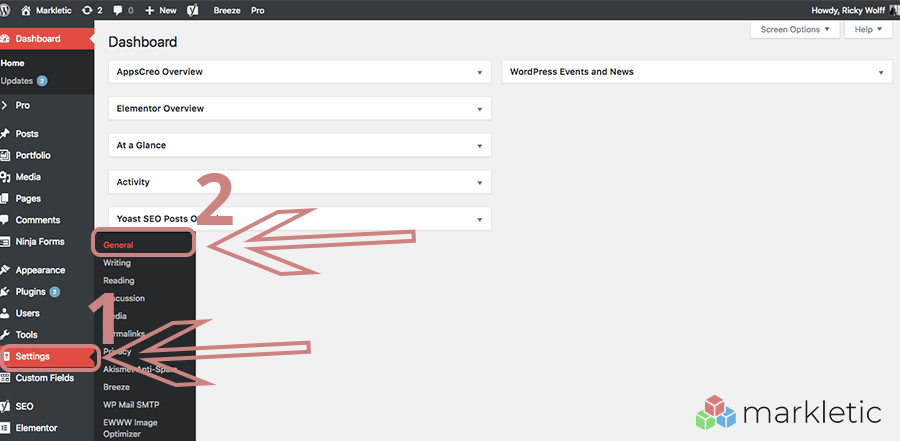
There is one last thing you need to do to successfully complete your SSL Certificate Installation.
First click on "Settings" and then click on "General".
Your final step is to change the URL from:
"http://www.your-domain.com" to "https://www.your-domain.com".
Make sure to save your changes at the bottom of the page!
Woohoo! You now have a lightning-fast, secure and reliable WordPress blog using Cloudways! You can now design your blog as you wish. I'm sure you will be able to create fantastic blogs with wonderful designs.
I'm very excited to see your blogs, please send me a link to your blog down in the comments or through my contact page.
Migrate your existing WordPress blog to Cloudways
If you already had an existing WordPress blog, then I've got some good news for you! You can easily migrate your blog to Cloudways.
Cloudways has created an excellent video on how to do this. This will only take a few minutes.
Here you can find how to migrate your existing WordPress blog to Cloudways.
That's it for now! I wish you the best of luck with your new blog! Get some coffee and start writing content for your blogs! Again, share your newly created websites with me! 🙂
The Next Steps
Of course, it would be a bit unfair to not help you any further. You have created a fresh blog and are excited to start designing it. Here are some extra resources:
Dropping the mic.
Share this article











i love blogging
Me too! Would love to see your blog!
Hey! Thank you for sharing! I followed your instructions and were successful in creating my blog.
Hey! Thank you! I'm glad you were able to create your blog using Cloudways. Good luck!
This was so helpful! Thank you so much!
You're welcome. I'd love to see what you're created!
Amazing and very helpful hacks! You are so genius on making all this. Thanks!
No worries! Glad you found it useful.
Wow great information about cloudways I am using it but I don't know how to add my domain name is this so my friend share me link of this article it is very useful and wall write article
Thanks
I'm glad you found it useful! 🙂